


Wie verbindet man einen Arduino mit Bluetooth-Modulen?

Globaler Lieferant elektronischer Komponenten AMPHEO PTY LTD: Umfangreiches Inventar für One-Stop-Shopping. Einfache Anfragen, schnelle, individuelle Lösungen und Angebote.
Hier ist eine praktische, no-nonsense-Anleitung, die sowohl Classic Bluetooth (SPP) -Module wie HC-05 / HC-06 und BLE (Bluetooth Low Energy) -Optionen wie HM-10 oder Arduinos BLE-Boards (Nano 33 BLE, ESP32 usw.) abdeckt.
1) Das richtige Bluetooth-Modul auswählen
-
Klassisches Bluetooth (SPP, z. B. HC-05/HC-06): Funktioniert wie eine „kabellose serielle Schnittstelle (UART)“. Läuft gut mit Android/PC. iOS unterstützt SPP nicht ohne spezielle MFi-Freigabe.
-
BLE (Bluetooth Low Energy, z. B. HM-10 oder Arduino Nano 33 BLE, ESP32): Arbeitet mit GATT-Services/Charakteristiken. Läuft sowohl auf Android als auch auf iOS, erfordert jedoch eine passende App oder Bibliothek.
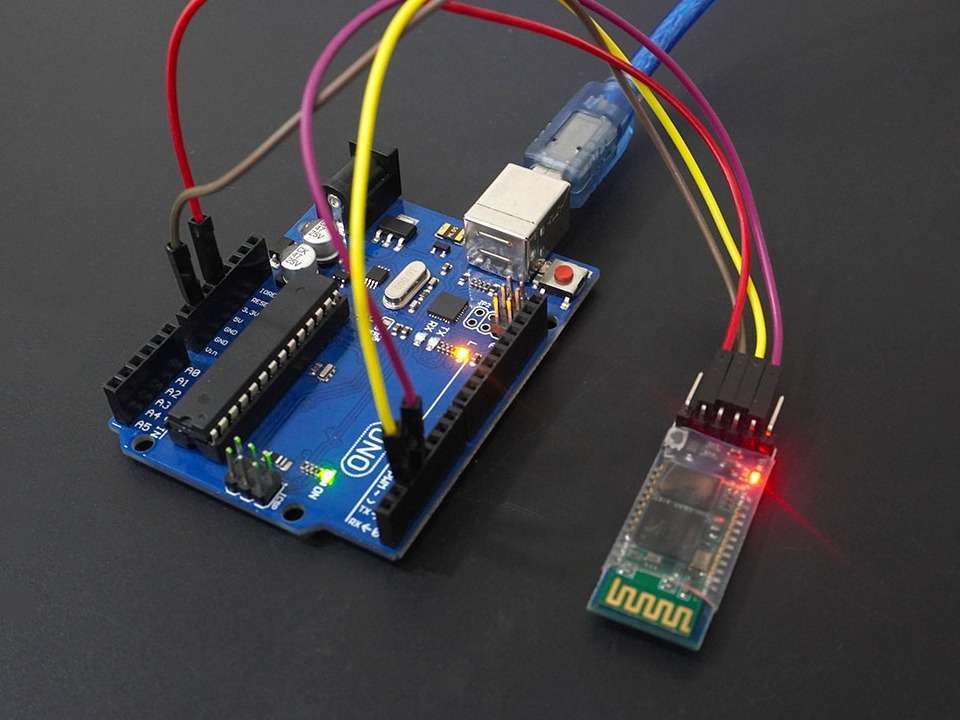
2) Hardware-Verdrahtung
A) HC-05 / HC-06 (klassisches SPP)
-
Stromversorgung: VCC → 5V; GND → GND.
-
Logikpegel: Modul arbeitet mit 3,3 V. Das RX-Pin darf keine 5V bekommen:
-
Arduino TX (5V) → Spannungsteiler → HC-05 RX.
-
HC-05 TX (3,3 V) → Arduino RX (meist problemlos lesbar).
-
-
Serielle Pins:
-
Arduino Uno:
SoftwareSerialauf zwei digitale Pins verwenden.
-
-
Key/EN-Pin (optional): HIGH vor dem Einschalten → AT-Modus (Standard: 38400 Baud).
Typische Uno-Verdrahtung:
-
D10 (Arduino RX) ← HC-05 TX
-
D11 (Arduino TX) → Spannungsteiler → HC-05 RX
-
5V → VCC, GND → GND
B) HM-10 (BLE im UART-ähnlichen Modus)
-
Stromversorgung 5V (viele Breakouts regeln intern auf 3,3V).
-
RX ebenfalls mit Spannungsteiler schützen.
-
Verdrahtung wie bei HC-05, aber auf der Handy-Seite muss eine BLE-fähige App verwendet werden.
C) Native BLE-Boards (Nano 33 BLE / ESP32)
-
Kein externes Modul nötig. Du programmierst direkt einen GATT-Service.
3) Beispiel: Klassisches SPP (HC-05/HC-06)
Test:
-
Modul koppeln (PIN 1234 oder 0000).
-
App „Serial Bluetooth Terminal“ (Android) verwenden.
-
Text eingeben, Arduino antwortet.
AT-Modus:
-
Key/EN HIGH, Baudrate 38400. Befehle:
-
AT→OK -
AT+NAME=MeinArduino -
AT+PSWD=1234 -
AT+UART=9600,0,0
-
4) Beispiel: BLE mit HM-10
-
Code wie oben nutzbar (transparent), aber auf dem Smartphone wird eine BLE-App benötigt (z. B. nRF Connect).
5) Beispiel: Echte BLE-GATT-Verbindung (Nano 33 BLE)
6) Nützliche Apps
-
SPP: Serial Bluetooth Terminal (Android), Bluetooth Terminal (PC).
-
BLE: nRF Connect (Android/iOS), LightBlue (iOS).
7) Stromversorgung & Layout
-
HC-05 Stromspitzen ~30–50 mA → stabile 5V sicherstellen.
-
Antennenbereich frei halten.
-
Abblockkondensatoren (0,1 µF + 10 µF) nahe VCC/GND platzieren.
8) Häufige Probleme
-
Keine Antwort: Baudrate falsch.
-
Wirre Zeichen: Falsche Zeilenenden (CR/LF testen).
-
AT-Modus klappt nicht: KEY vor Power HIGH.
-
iPhone findet Modul nicht: HC-05 ist nur SPP → BLE nutzen.
-
RX beschädigt: 5V ohne Teiler eingespeist.
9) Sicherheit
-
Bei HC-05: Name + PIN ändern.
-
Bei BLE: Schreibrechte einschränken oder App-seitige Authentifizierung einbauen.
10) Entscheidungshilfe
-
Android/PC, einfache serielle Brücke: HC-05.
-
iOS-Unterstützung oder moderne Apps: BLE (HM-10, Nano 33 BLE, ESP32).
-
Professionelle BLE-Anwendungen: ESP32 oder Nano 33 BLE mit GATT.
Verwandte Artikel
- ·Welche Sprache ist am besten für Robotik, IoT, KI, Spiele oder Web-Apps?
- ·Raspberry Pi Pico vs Arduino Nano vs STM32 Blue Pill vs ESP32 vs STM32 Black Pill | Vergleich
- ·Wie nutzt man Arduino für IoT-Anwendungen?
- ·Wie erstelle ich ein physisches Mikrocontrollerprojekt mit nuller Grundlage?
- ·Warum sind 4-Bit-Mikrocontroller noch nicht abgeschafft?
- ·Wie benutzt man Beschleunigungsmesser mit Arduino?
- ·Smart Socket basierend auf STM32
- ·Was ist der Unterschied zwischen Programmiermikrocontrollern und DSPs?
- ·Was sind die beliebtesten IoT Development Boards?